Stomach Wowes and Breakfast on the Go

Many of you know I have had a neverending battle and cycle of stomach issues that defy reason. In the last couple of months I cut out lactose thinking my issues were linked to dairy and whey, which eliminated my breathing/wheezing/dry coughing issues. But, it seemed the healthier I ate, my stomach issues got worse. An artichoke for a side dish,  spinach salad with pears or an apple for a snack would leave me in severe stomach pains for hours, but pizza and beer would leave me and my stomach perfectly happy. Yes, pizza with cheese and obviously lactose and whey.  WTF?  Was I going crazy???

One day about a week ago I came home with stomach cramps after having had an apple for an afternoon snack and googled my symptoms. I came across this article about “fructose malabsorption/intolerance” and the light bulb finally went on. I finally knew why eating a fresh apple gave me stomach aches yet I could eat apple pie. And I now understood what foods to avoid so I could eat to fuel my body the way I want it to feel. I already knew eating artificial sweeteners, Bud Lime and too much wheat gave me issues, and I can now add some fruits, sugars and veggies to the list.

I was working with a doctor back in NH on some of these issues as well as an overall “inflammation” issue that is wreaking havoc on my thyroid. It is now widely believed that chronic inflammation that goes untreated for years is the underlying cause of many illnesses such as type II diabetes, heart disease, stroke, cancer, Alzheimer’s, autoimmune diseases (rheumatoid arthritis), Crohn’s disease, migraines and more.  It’s readily apparent I’m on that path and I see the train coming.  While money can’t buy you happiness, it can help with your health and when I had a nice income, I was able to pay for a gym membership, all organic meats, veggies, supplements, frequent doctor visits, nutritionists, kinesiology, and everything I needed to keep myself in good health.  My income may be gone, that doesn’t mean I have to eat Kraft Mac & Cheese and Little Debbies and make excuses for not trying for better overall health. I don’t believe being on a budget means eating processed food, and have instead put more time into making more food from scratch. Following an Anti-Inflammation diet is in my control, doesn’t have to cost a fortune and will help both my PCOS, thyroid, and inflammation issues. And so I begin the challenge of figuring how to eat, combining my new found knowledge of fructose intolerance with an anti-inflammation diet.

I’ve started with a couple of breakfast recipes I found via Pinterest on a blog site called chocolatecoveredkatie, the last via smashedpeasandcarrots.  I changed them a bit, but the results are great, for breakfast or for a healthy snack/dessert idea, especially for kids!

Banana Breakfast “Cookies”

  • 1/2 cup old fashioned rolled oats
  • scant 1/2 cup mashed banana (can sub applesauce)
  • 1/4 cup natural peanut butter
  • 1/2 tsp pure vanilla extract
  • pinch salt
  • 2 1/2 Tbsp dark  chocolate chips (or raisins, cranberries, dried raspberries, etc.)
  • 1 T agave nectar, honey, maple syrup, sugar or whatever sweetener you prefer
  • 2 Tbsp protein powder (I had banana whey, but use whatever you have or omit)

Preheat the oven to 350 degrees. Mash the banana with the peanut butter, then add all other ingredients and mix until well-combined. Shape into cookies (I used a small cookie scoop) and bake on a greased cookie sheet for around 14-16 minutes, then let cool 10 minutes before removing from sheet. This makes 10-12 cookies, perfect for breakfast!

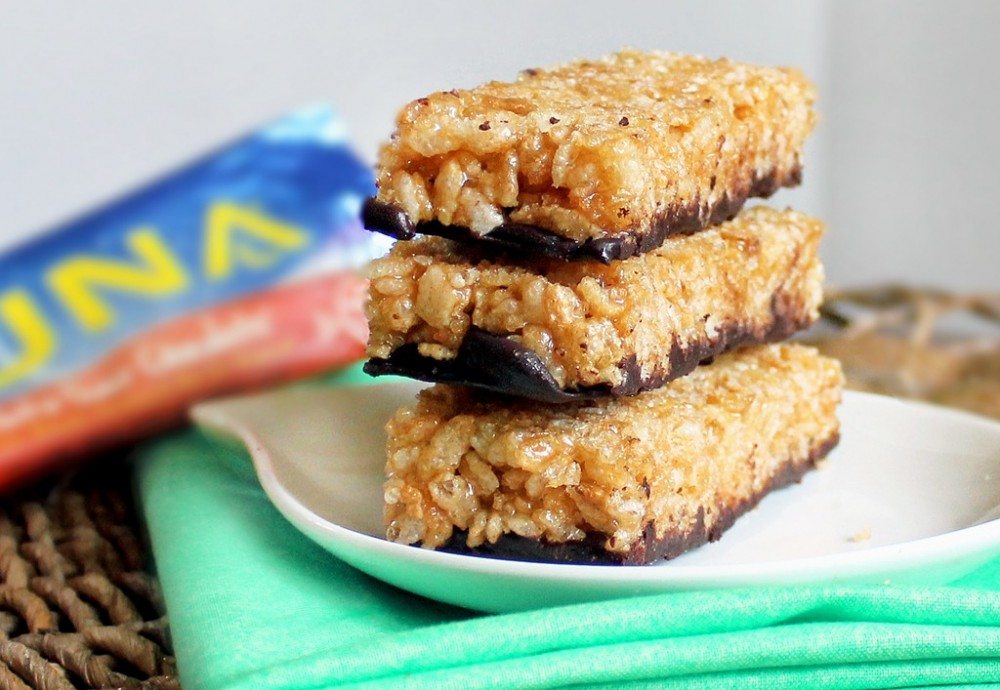
Homemade Luna Bars

homemade luna bars

  • 3 cups rice crispies (You can use brown rice crispies. For a less-crispy bar, you can sub 2 cups of the crispies for 1/2 cup oat flour.)
  • 2 tsp pure vanilla extract
  • 1/2 tsp salt
  • 1/2 cup plus 2 tablespoons peanut butter
  • 1/2 cup sticky sweetener, such as agave or brown rice syrup (I used agave)
  • 2-3 tablespoons protein powder (I used banana whey, but if you don’t have, you can omit)
  • dark chocolate chips

Mix your pb, sweetener, extract, and salt. Melt (either in the microwave or stove), then pour over the cereal and powder, and stir very well, making sure to coat all the crispies. Smush and smash the crispies. (Get mad; it’s fun!) Line a pan with wax paper and spread the mixture evenly into the pan. Place a sheet of wax paper on top of the mixture, then press down as firmly as you can. Really press it down! Melt chocolate chips in the microwave or on top of the stove with a bit of oil, and spread on top. Freeze for at least a half hour before slicing.  I did half w/ & w/o chocolate chips as the ones with taste like a Whatchamacallit candy bar instead of breakfast!

No-Bake Energy Bites

(source: http://smashedpeasandcarrots.blogspot.com/)

(makes 18-20 bites)
1 cup oatmeal
1/2 cup peanut butter (or other nut butter)
1/3 cup honey
1 cup coconut flakes
1/2 cup ground flaxseed (I didn’t have this)
1/2 cup mini chocolate chips (I prefer these without the chocolate, craazy!)
1 tsp vanilla
Mix everything above in a medium bowl until thoroughly incorporated.  Let chill in the refrigerator for half an hour.  Once chilled, roll into balls and enjoy!  Store in an airtight container and keep refrigerated for up to 1 week. HIGHLY addictive!
Categories: Apple, Banana, Breakfast, Uncategorized | Leave a comment

Wicked Easy Yummy Bread

I have a new obsession…bread. Wicked easy yummy bread! It started as a budget measure when spending $5 on a loaf of bread became impossible, but has since become part of my weekly routine, along with my Kickin’ Roasted Chicken.  I found this on Pinterest (duh, where else?) and have found it to be pretty fool proof as I am NOT a bread baking expert. 

The best part? Only 4 ingredients and no kneading!  I love that you take 4 basic ingredients, dump everything in a bowl, mix it up, let it rest, pop it in the fridge, then take a hunk when you want to bake some bread.  I love that it can stay in the fridge up to 2 weeks (although one recipe barely lasts a week) and that we always have fresh bread – the kind that’s a little crispy on the outside and soft on the inside.  MMMMMmmmm.

I take no credit for this, I found it via Pinterest on this blog called “Artisan Bread in 5 Minutes a Day”.  I want their book!

Wicked Easy Yummy Bread:

3 cups lukewarm water

1 1/2 tablespoons granulated yeast

1 to 1 1/2 tablespoons Morton’s Kosher Salt

6 1/2 cups (2-pounds) unbleached all-purpose flour (don’t use bread flour!)

In a 6-8 quart bowl/bucket, dump in the yeast, add the water, and mix.  Then add the salt and flour, and mix to a wet sticky dough. It will NOT look like your normal nice round dough that you could actually pick up. Then, cover with wrap or the lid but leave a hole to allow the yeast to breath. Let rest on the counter for 2 hours. Then, you can work with it, but it’s still sticky, so it’s better if you put it in the fridge to chill for a bit.  That’s it! When you are ready to use it, later in the day or the next day, sprinkle with flour, grab some, create a ball, let rest for 30-60 minutes, then bake on a preheated stone or pan for 30 min or so.  Then, if you can stand it, let it rest before cutting.  YUMMMMMMM!!!!!!!!!!!!


Categories: Uncategorized | Leave a comment

The BEST Roast Chicken EVER!!!!

Am I the only one who loved the Rotisserie Chickens you can buy in the supermarket?  If so, stop reading. But if you are like me, I have the BEST roast chicken recipe that tastes much like those in the supermarket! This is now my go-to favorite recipe and method…discovered a little by accident.  I make it about once a week, sometimes roasting it in the pan with carrots, onion and potatoes, sometimes not. I use the leftovers in YCPP (Yummy Chicken Pot Pie), Baked Chicken Taquitos, Chicken Tacos, OMG Chicken Salad, or just leftovers because it’s soooo good!


Kerri’s Kickin’ Chicken 

4 teaspoons salt
2 teaspoons paprika
1 teaspoon onion powder
1 teaspoon dried thyme
1/2 teaspoon cayenne pepper
1/2 teaspoon black pepper
1/2 teaspoon garlic powder
1 onion, quartered
4-5 pound whole chicken


  1. In a small bowl, mix together salt, paprika, onion powder, thyme, black pepper, cayenne pepper, and garlic powder. Remove and discard giblets from chicken. Rinse chicken cavity, and pat dry with paper towel. Rub each chicken inside and out with spice mixture. ALSO, and don’t skip this! Separate the skin from the meat on top of the breasts on both ends and rub directly onto the skin.  I thought it interesting recipes instruct us to season the outside of the skin, but not the meat inside.  I like a little skin, but not a lot, so it’s important to get the meat seasoned.
  2. Place quartered onion into the cavity of the chicken. Place chicken in a resealable bag or double wrap with plastic wrap. Refrigerate overnight.
  3. Preheat oven to 250 degrees F.
  4. Place chicken in a roasting pan (on top of a rack if you have one) .  BUT, pace it UPSIDE DOWN (breast side down)…. I did this by accident but discovered that the breast meat got really tender and didn’t dry out.  However, you won’t be able to eat the skin as it doesn’t get crispy. It isn’t a big deal to me as I don’t eat the skin.
  5. Bake uncovered for 5 hours, to a minimum internal temperature of 160 degrees F. Let the chickens stand for 10 minutes before carving.

You can also place veggies in the pan about halfway through if you like. I do that an it’s a great easy meal!  Then…after you eat all the meat, don’t throw out the bones! Throw everything in a pot (even the veggies if you have any leftover, boil with some chicken bullion, strain and save for chicken broth.

Categories: Uncategorized | Leave a comment

What a Crock!

I’ve had some issues blogging…had a little issue posting one thing too early, then worked on another for hours only to have it disappear. Now, I’ll only be posting a few recipes in a blog so it doesn’t as much time. We made it through our goal of spending less than $300/month on food, and the last couple of weeks had those crock pot freezer meals I was so excited about.

I’m here to give you the 411 on bagging, freezing and crocking the food
like we’ve been reading about via    and blogs like this:

Here are the recipes I bagged and froze or made in a crock the last couple of weeks:

  • Buffalo Chicken (via Pinterest)
  • A1 Pot Roast (my recipe)
  • Healthy Mama’s BBQ Chicken (via blog above)
  • Stephanie’s Goulash (no idea who Stephanie is, via blog above)
  • Pineapple Chicken (via Six Sisters blog, found on Pinterest)
  • Split Pea Soup (my recipe)

I was pretty excited when I started this crock venture. It’s a great idea, right?  Get your food, prep everything, freeze it, pop it in the crock and you have dinner when you get home.  Perfect! THANK YOU PINTEREST for SAVING MY LIFE!!!!  Well, just like the men in my life, if it looks perfect, it isn’t.  Previous to this, most of my crock cooking has been soups, stews, and pot roasts. After this, most of my crock cooking will probably be soups, stews and pot roasts…let’s be real.  I quickly learned:

  1. I don’t like mushy, tasteless veggies.

  2. Eating baby food is for babies.
  3. Boneless, skinless chicken pretty much turns into shredded chicken, or has that texture, whether you like it or not.
  4. Bone in with skin chicken results in a greasy mess with other “unidentifiable” parts in the rest of the meal.
  5.  Putting 18 different foods into a crock and expecting a gourmet meal is as unrealistic as me entering the Tough Mudder competition.
  6.  None of these meals will be featured on Food TV. Speaking of which, how come you never see a crock on Food TV?

I still have (2) Crock Pot meals in the freezer – Chicken & Cherries and Chicken Curry, and I am scared. Very, very scared.  Of the meals I made, I would make the Buffalo Chicken, A1 Pot Roast, and Split Pea Soup again. Funny, two of the three were my recipes and NONE are the bagged pre frozen meals : ( .  Have you tried the freezer crock method? Share your experiences with me because I really WANT it to work!

Slow Cooker Buffalo Chicken
(adapted from http://mykitchenapron.blogspot.com/2011/07/crock-pot-buffalo-chicken.html)
     1 lb. boneless skinless chicken breasts
     1/2 cup Frank’s Wings Sauce
     1 packet Ranch Dip Mix
     1 TBSP butter
  1. Put chicken, wing sauce, and 1/2 ranch dip mix into crock pot.
  2. Cook on low at least 4-6 hours
  3. Using two forks, shred chicken & return to crock pot. Add more ranch to taste.
  4. Add butter.
  5. Cook on low for an additional hour.
  6. Enjoy – I serve on rolls spread with ranch dressing & cole slaw.
  7. I also used the leftovers in “Buffalo Bites” – use biscuit dough, flatten, put a spoon of buffalo chicken on one half, fold over, pinch to seal, then bake.  YUM!

Split Pea & Ham Soup

16 ounces dried split peas
2 cups diced fully cooked lean ham
1 cup diced carrots
1 medium onion, chopped
2 garlic cloves, minced
2 bay leaves
1/2 teaspoon salt
1/2 teaspoon pepper
5 cups boiling water
1 cup hot milk

In a slow cooker, layer all but the milk in order listed (do not stir). Cover and cook on high for 4-6 hours or until vegetables are tender. Stir in milk. Discard bay leaves before serving.

A1 Pot Roast

3-4 lb pot roast
1/4 cup water
1 can cream mushroom soup
4 T A1 steak sauce
1 pkg. onion soup mix

Crock method: Mix water, soup, steak sauce, onion soup mix. Place roast in crock, cover with A1 mixture & cook on low 6-8 hours.
Non crock: Combine all ingredients in a pan, wrap with aluminum foil, and bake at 350 for 3 hours.

I did try this via the freeze then cook and added veggies.  I wouldn’t recommend – the veggies are mushy and the A1 is too strong and overpowers the veggies.

Categories: Uncategorized | 2 Comments

OOOOps, stay tuned

Funny thing happened while I’m sitting here watching Chopped…I was working on a post and I hit “tab” then backspace which somehow spontaneously published my unfinished post.  Sorry, please stay tuned til I finish!

Categories: Uncategorized | Leave a comment

Week 3 begins Crock Pot Meals

In a word, this week sucked. Jonesing for chocolate, at the end of a lot of our food, bad planning and running out of staples led to major frustration for breakfast and lunches.  I would definitely do things differently next month now that I know how much we need to last us the full 4 weeks. One morning I was having a meltdown trying to find something for both breakfast and lunch I might as well have been on the next season of Survivor on an island with three foods available….rice, coconut milk and canned chicken. That morning, as I was running around to get ready for work and running in circles trying freaked out that I had nothing for the first two meals of the day…exclaiming that I am 5 seconds from RAGE (AKA PMS), Bobby suggests I have egg beaters in a wrap and I nearly threw my can of hair spray at him because the thought of yet another egg beater meal made me want to hurl.  So in a rage I took his cup of coffee, my cup of coffee, threw them both in the blender with vanilla almond milk, ice and some of those freaking egg beaters.  Much to my surprise, it was delightful.  After that I found a can of chicken breast in the back of the cabinet and took that to work with me, where I later had it on a wrap and threw the frozen bag crockpot meal into the slow cooker..  Some days I feel like a homeless person…but we’ve had some other great comfort meals this week so don’t let me fool you!

Our meals:

Breakfast:

      Smoothies from whatever I can find

       Egg Beaters done 18 ways…pretty sick of egg beaters but we bought a 6 pack from Costco…at least now I know I can hide them in smoothies!

      Bobby can eat cereal, but with my dairy issues I cannot.  Yes Mom, I am now taking a Calcium with magnesium supplement.


Lunch:

       Broccoli Salad, Apple Chicken sausage w/ caramelized onion, sliced pears


Dinner: not quite low fat… Roasted chicken w/ veggies, homemade biscuits, gravy…after a week of seriously shitty meals, this was awesome!!!


Glazed Meatloaf & Mashed Sweet Potatoes

Roasted Chicken – Chicken & Biscuits

Pineapple Chicken – Sweet & Sour Chicken

Buffalo Chicken

Broccoli Salad w/ Apple Chicken Sausage, Carmelized Onions

Crock Pot Pineapple Chicken


I had been looking at a few recipes online for chicken and pineapple together and threw this together.  It was so easy and we really liked it!!
 
4 frozen chicken breasts
1/2 c. soy sauce
1/2 c. teriyaki sauce
1 can pineapple chunks,  drain half the juice out
Crushed red pepper flakes


Spray the crock pot with nonstick cooking spray and add chicken breasts.  Pour soy sauce, teriyaki sauce, and pineapple chunks (with half of the juice) over the chicken.  Sprinkle as many red pepper flakes on top as desired.  Cook on high for 4-6 hours.  Shred chicken with two forks in the crock pot and serve over rice.
Categories: Uncategorized | Leave a comment

Staying on Budget with Apples

For years I have bought way too much produce only to throw out probably 50% of what I buy before I have the chance to eat it due to spoilage.  I was determined NOT to let that happen this time!  Little did I know when I challenged myself to this Mission Impossible: Eating Healthy on a Budget that I’d end up eating spinach salad nearly every day.  I also didn’t realize that when I cooked a seriously nasty over salty tilapia that I’d force it down because I had nothing else to eat.  No frozen pizzas, no snack foods to fill up on, no granola bars or toast. I also had no idea I’d get sick for the second time in a month and really not feel like cooking a damn thing…Couple things I learned this week: yup, I still hate salad…and when you’re sick with a cold the last thing you want to do is eat salad…

We’ve had to buy a few things since our initial grocery shopping trip, so our monthly running total:
$252       initial shopping 1/16/12
$  12.06  milk, almond milk, tangerines for tea & pears, ginger ale for that cold
______
$264.06  Running Total

Goal for the month: to stay UNDER $300…can we make it two more weeks?

This week I had to use up all the fresh foods, but didn’t cook as much….

MEALS FOR THE WEEK:

Breakfast:

Stewed Apples – I use these for everything from smoothies, oatmeal, a snack or a “dessert” with granola & whipped cream (recipe follows)

Apple Smoothies (recipes follow)

Apple Chicken Sausage w/ Egg Beaters in a WrapLOVE AlFresco Chicken Sausage!

Baked Apple Cinnamon Oatmeal (recipe follows)

Lunch:

Spinach & Pear Salad w/ Granola

Roasted Veggie Flatbread (used leftover roasted vegetables, flatbread recipe follows)

Dinner:

Roasted Chicken & Veggie Pie (last time I roasted a chicken, I saved the cooked veggies and some chicken, but it in a bag with a little chicken broth & froze it.  One of the days I was sick I then took the bag out, heated up the mixture, thickened it a bit …using some Cream of chicken Soup would also work great but nooooo I don’t have any…then I put everything in a pie crust and topped it with homemade stuffing…a normal person could use Stove Top but I’m neurotic and save my stale bread to make my own stuffing & bread crumbs.)

Pot Roast in a Crock (Bobby cooked, I think he put beef in a crock with Cream of Mushroom Soup,
an Onion Soup packet and???)….which turned into beef stew another night

Steak, Snow peas & brown rice

Unsuccessful baked tilapia & asparagus…the tilapia was WAY over salted & the asparagus overcooked

Unsuccessful beef & broccoli…

We were lucky enough to go out for pizza one night, YUM!

Sweet Somethin’s

Nut Bark

RECIPES:

Stewed Apples:

I have no formal recipe, this is just something I have done for years. It’s a great way to use up apples that are a little past ripe, or if you have an excess.
Peel, core and slice however many apples you desire, I usually do this with 4-6 as I use them for so many things throughout the week.
Place in a saucepan with about 1/4 cup of apple juice, apple cider, or water. (Whatever you have on hand)
Sprinkle with cinnamon and drizzle a little maple syrup or agave nectar (abut 1T).
Cover and let simmer on low heat for about 30 min.  Keep checking – if it dries out, add more liquid.
Cook to desired tenderness – if you want them mushier, keep cooking until they are nearly applesauce consistency.

Apple Smoothies:

Kerri’s Rating: 5/5 yums: Amazingly yummy!

Dump all ingredients in a blender until smooth, serves 2:

Apple Peanut Butter Smoothie:
(2) cups vanilla almond milk, stewed apples, 1tsp natural peanut butter, ice.

Apple Pie Smoothie:
(2) egg whites (don’t be scared, but if you are, omit) – blend until frothy, then add:
(2) cups vanilla almond milk, stewed apples, 2tsp maple syrup, 1/2 tsp cinnamon, 1 tsp vanilla, ice.

Baked Apple Cinnamon Oatmeal

Kerri’s Rating: 5/5 yums: Very easy and filling, great to make ahead.

1 cup old fashioned rolled oats
2T light brown sugar
1/2 tsp baking powder
1 tsp grated orange zest
1 tsp cinnamon
1/4 tsp salt
1/4 cup walnut pieces, chopped
1 cup stewed apples
1 1/2 cups milk
1 large egg
1 T smart balance oil
1 tsp vanilla extract

Preheat oven to 375°F and generously spray the inside of an 8″ square baking dish with cooking spray.
In a large bowl, mix together the oats, sugar, baking powder, orange zest, cinnamon, salt, half the apples.
In another large bowl, whisk together the milk, egg, butter and vanilla extract.
Add the oat mixture to prepared baking dish. Arrange the remaining apples and the walnuts on top. Pour the milk mixture over everything. Gently shimmy/shake the baking dish to help the milk mixture go throughout the oats.
Bake 35 to 40 minutes or until the top is nicely golden brown and the milk mixture has set. Serve warm with a  drizzle of maple syrup.

Roasted Veggie Flatbread:

Roasted Veggie Flatbread w/ Spinach Pear Salad & Dr. Oz's Metabolism Green Tea

Kerri’s Rating: 5/5 yums: This flatbread dough was fast and easy to make and turned out awesome! Could also be used for pizza.

1 envelope active dry yeast
1 cup warm water
2 cups bread flour
1 teaspoon salt
2 teaspoons white sugar
2 tablespoons olive oil
2 tablespoons garlic powder
Roasted Veggies, or any topping you’d like
1/4 cup grated Parmesan cheese
1/3 cup shredded mozzarella cheese

In a cup or small bowl, sprinkle yeast over the surface of the lukewarm water. Let stand for 5 to 10 minutes to dissolve.
In a large bowl, stir together the flour, salt and sugar. Pour in the yeast mixture along with the olive oil. Beat with a sturdy spoon until dough is stiff enough to pull away from the sides of the bowl. Cover, and set aside until doubled in size, about 35 minutes.
Remove the dough from the bowl and knead briefly on a floured surface. Roll the dough out to 1/4 to 1/2 inch thickness or to the size of your baking sheet. Place on a greased baking sheet and brush olive oil over the top, then sprinkle with garlic powder and veggies. Top with Parmesan cheese and mozzarella cheese. Let rest while you preheat the oven to 350 degrees F (175 degrees C).
Bake for 20 minutes in the preheated oven, until golden brown and cheese is bubbly. Serve warm.

Nut Bark

Kerri’s Rating: 5/5 yums: One small piece helps curb those chocolate cravings!

Line a pan with waxed paper, then sprinkle 1 cup of your choice of nuts on top.
In a saucepan or in the microwave, melt 1/3 cup of dark chocolate chips and 1T peanut butter.
Pour over nuts, harden in fridge.  After solid (couple of hours) break up and enjoy!


Categories: Apple, Eggs, Salad, Smoothie, Uncategorized, Veggies | Leave a comment

Fresh Foods make Fresh Recipes: A Week of Meals

The first week after bulk grocery shopping we had lots and lots and lots of fresh foods and veggies which is a double edged sword…healthy eating but I had to figure out meals that used them so we didn’t waste anything.  My other challenge: I have traced my weird dry cough back to dairy so I haven’t been able to grab cereal or yogurt in the morning or rely on cheese for snacks. We ate pretty well this week, especially compared to our holiday eating frenzy, but because we don’t own a scale the only indicator of weight loss will be how our clothes fit. Which, in some ways, makes it less “head-gamey” and more about how we feel.  I can report that I was feeling good and like I had more energy…until I came down with a cold/flu at the end of the week.

WARNING: Eating mostly fresh/non packaged foods takes time! I had accepted this but still wasn’t prepared. We don’t own a microwave so there’s no quickly doing oatmeal in the morning or coming home from work and just reheating something for dinner.  But, NOTHING goes to waste, and sometimes I feel like I’m on an episode of “Chopped” or “Iron Chef” trying to figure out what to do with the leftovers…

Last blog I told you how I prepped a bunch of meals, but most of what I froze were meals for AFTER all the fresh foods were eaten. This week it was my goal to eat the veggies and fruit before anything spoiled. So far, so good!  Our meals for the week looked like this:

BREAKFAST:
Smoothies (recipes follow)

Ham & Broccoli Egg Beater Frittata (used leftover broccoli from an earlier dinner, recipe follows)

Pear & Walnuts (pretty wimpy…this was at the end of the work week when I hadn’t planned ahead)

LUNCH:
I had prepped those and did well eating either leftovers or salad. I found presliced cucumbers and
sugar snap peas to be a refreshing nice “crunchy” snack at work

I try to have sauteed chicken on hand all the time for salads during the week

Spinach & Strawberry Salad w/ Sauteed Chicken (recipe follows)

Wilted Spinach & Asparagus w/ Balsamic Vin & Chicken

DINNERS:

Baked Parmesan Chicken (not to be confused with Chicken Parmesan) & Roasted Broccoli (recipes follow, this is the broccoli I later used in the frittata)

Chicken Stuffed w/ Asparagus & Roasted Veggies (used asparagus I roasted earlier in the week, recipes follow)

Beef Stir Fry w/ Veggies over Brown Rice (Bobby made this as I was coming down sick…I think he marinated sirloin steak in teriyaki, sliced thin, sauteed a bunch of veggies, flash cooked the beef, served everything over brown rice)

And…just so you know I’m human…PB&J on white bread one night we got home too late to cook!

SWEET SOMETHIN’ SOMETHINS:

Banana Bites (recipe follows)

Strawberries & Trader Joes low fat, low sugar, all natural “House Whip”

A dessert plate of strawberries & house whip, walnuts & banana bites for Bobby and I:

Lessons Learned on Meal Planning:

Breakfast:  It’s an easy meal to skip, easy to not have what you need to grab and go. I wasn’t prepared the last 2 days of the week and ended up with a pear and nuts. I need to make a batch of granola or granola bars 1X/wk AND bake the frittatta (or something else) ahead.

Lunch: Prep ahead as much as possible and make sure you have a protein (sauteed chicken, canned chicken or tuna, etc.) available to grab.

Dinner:  I always make enough for leftovers, so even though I’m cooking for two I always cook four servings. I don’t always re-eat the same meal, the leftovers may be reused in another meal so we don’t get sick of the same thing. I cooked so many veggies I had to get creative in how and when I reused them!

RECIPES:

Banana Smoothies:


Kerri’s Rating: 5/5 yums: So yummy you feel like you’re eating dessert!

You could add protein powder, yogurt or use real milk but I’m avoiding dairy and soy.

Dump all ingredients in a blender until smooth, serves 2:

Chocolate, Peanut Butter and Banana Smoothie:
(2) cups chocolate almond milk, (1) banana, 1T natural peanut butter, 1t vanilla, ice.

Vanilla Banana Smoothie:
(2) cups vanilla almond milk, (1) banana, 1/4t nutmeg, 1t cinnamon, 1 t vanilla, ice.

Ham & Broccoli Egg Beater Frittata

Kerri’s Rating: 3.5/5 yums: Good but I didn’t like too much broccoli, and because of the lower fat ingreds the texture is not as rich as quiche.

3/4 cup chopped ham
1 medium onion, chopped (1/2 cup)
1/2 cup cooked broccoli (I used leftover broccoli from an earlier dinner)
3/4 cup milk
1 egg
1 cup egg beaters
1/4 t salt
1/4 t pepper
A few shakes of “Nature’s Seasoning”
1/2 cup shredded reduced-fat Cheddar or Jack cheese

Spray 10-inch nonstick skillet with nonstick cooking spray and heat over high heat. Reduce heat to medium-high. Add ham; cook 2 to 3 minutes, stirring frequently, until lightly browned. Remove ham from skillet; cover to keep warm. To same skillet, place onions and 1/2 cup of the milk. Heat to boiling, then reduce heat to medium. In small bowl, mix eggs and egg whites, the remaining 1/4 cup milk, the salt pepper, and Nature’s Seasoning until well blended. Stir ham, broccoli and egg mixture into pan. Reduce heat to medium-low; cover and cook without stirring for 10 minutes. Remove skillet from heat; remove cover (eggs will not appear completely cooked). Sprinkle cheese over top. Let stand 2 to 3 minutes or until egg mixture is set and cheese is melted. Cut into wedges to serve.

Spinach & Strawberry Salad

Kerri’s Rating: 4/5 yums: You know how much I hate salad, so I’d never give a salad 5 yums, but this was great!

Couple handfuls of baby spinach (however much you like for a salad)
6-8 strawberries, sliced
1/3 cup chopped walnuts
1 tsp agave nectar (or honey or maple syrup)
homemade light ranch dressing (or your choice of salad dressing)

In a bowl, combine the spinach, strawberries and dressing, toss to coat. In a small saucepan, toast the walnuts for just a moment or two, add the agave and allow to coat the walnuts. Sprinkle the walnuts on top of the salad. Serve with chicken, if desired.

Light Ranch Salad Dressing:


1/2 cup light mayonnaise
1/2 cup sour cream
2 t olive oil
2 t lemon juice
1/4 cup buttermilk (I already had powder to mix w/ water, otherwise I’d use milk w/ vinegar)
1 Tbsp chopped green onion (I grow my own…more on that in a future post!)
1 t parsley
1 clove garlic
1/2 tsp sea salt
1/4 tsp freshly ground black pepper

Mix all and store in an air-tight jar in the fridge.  Leftovers will keep 2-3 weeks.


Baked Parmesan Chicken

Kerri’s Rating: 5/5 yums: So yummy, this has been a favorite chicken recipe of mine for many years. DON’T be afraid of the mayo – you don’t taste it.
3/4 cup mayonnaise
1/2 cup grated Parmesan cheese
3/4 teaspoon garlic powder
3/4 cup Italian seasoned bread crumbs
4 skinless, boneless chicken breast halves


Preheat oven to 425.
In a bowl, mix the mayonnaise, Parmesan cheese, and garlic powder. Place bread crumbs in a separate bowl.
Dip chicken into the mayonnaise mixture, then into the bread crumbs to coat.
Arrange coated chicken on a baking sheet.
Bake 20 minutes in the preheated oven, or until chicken juices run clear and coating is golden brown.

Roasted Broccoli

Kerri’s Rating: 4/5 yums: Now my fav way to cook veggies! I didn’t have fresh parmesan and I didn’t have enough seasoning on mine, will need to adjust.

Couple bunches/2lbs broccoli (if you wash, make SURE they are fully dry)
2 garlic cloves, minced
olive oil
1 t kosher salt
1/2 t freshly ground black pepper
1 t grated lemon zest
2 T lemon juice
1/4 c parmesan cheese

Preheat the oven to 425. Put the broccoli on a cookie sheet. Toss with olive oil, salt, pepper and garlic. Roast for 20 to 25 minutes, until crisp-tender and the tips of some of the florets are browned.Remove the broccoli from the oven and immediately toss with a little olive oil, the lemon zest & juice and Parmesan. Serve hot.

Chicken Rollatini Stuffed w/ Asparagus & Jack

Kerri’s Rating: 5/5 yums: I winged this, but it was SOOOO good!!!!! Will definitely be a regular way to use up leftover veggies.

2 oz light cream cheese
1 tsp garlic, minced
1/2 -1 cup asparagus, cooked & chopped (I used leftovers I had)
1/4 cup parmesan cheese
1/4 cup monterey jack cheese, shredded
salt and pepper to taste
4 chicken breasts, pounded thin (If large, cut in half so each piece of chicken is about the size of your hand)
1/2 cup Italian seasoned breadcrumbs w/ 1/4 cup parmesan cheese
1/2 lemon, juice of
2 tsp olive oil
Nature’s seasoning, salt and fresh pepper
olive or canola oil non-stick spray

Preheat oven to 450°. Season chicken with Nature’s seasoning, salt and pepper. Lightly spray a baking dish with non-stick spray. In a small bowl, combine the cream cheese, garlic, asparagus, parmesan and jack cheese. You need the consistency to be a good ratio of cheese to veggies.
Lay chicken cutlets down on a working surface and spread 3 tbsp of asparagus-cheese mixture on each cutlet. Loosely roll each one and keep seam side down.  Combine breadcrumbs and grated cheese in one bowl; in a second bowl combine olive oil, lemon juice, and pepper in another bowl. Dip chicken in lemon-oil mixture, then in breadcrumbs and place seam side down in a baking dish (no toothpicks needed). Repeat with the remaining chicken. When finished, lightly spray with oil spray. Bake 25 – 30 minutes. Serve immediately.

Oven Roasted Veggies:

Kerri’s Rating: 4/5 yums: I didn’t make with asparagus since I made it with the asparagus chicken, but I was surprised to find I loved the brussel sprouts! I felt like I was heavy on the oil but too light on the seasoning. Will need to adjust.

1 medium zucchini
1 medium summer squash
1 medium red bell pepper
1 medium yellow bell pepper
1/2 lb fresh asparagus
1/2 lb brussel sprouts
bunch of broccoli
1 onion , chopped
3 tablespoons extra virgin olive oil
1 teaspoon salt
1/2 teaspoon black pepper

Preheat oven to 450 degrees. Cut veggies into bite-size pieces and place in a large roasting pan or on a cookie sheet. Toss with the oil, salt and black pepper. Spread in a single layer. Roast for 30 minutes, stirring occasionally, until vegetables are lightly browned and tender.

Frozen Banana Bites

Kerri’s Rating: 5/5 yums: A couple of these after dinner really helps satisfy the sweet tooth. I found chunks larger than 1/2″ too big.

2 large bananas
1/4 cup dark chocolate chips
2Tbsp natural peanut butter

Place waxed paper on a cookie sheet or large plate. Cut bananas into bite size chunks (I had a hard time with larger chunks & sensitive teeth), about 8-10 pieces/banana. Heat PB & chocolate (in micro or on stove) until melted enough to stir until smooth. Using a fork, dip the bananas into the chocolate mixture, then lay on the wax paper. Continue with the rest of the banana pieces, and if any chocolate remains you can spoon it on top of the bananas. Place in freezer, will be frozen in about an hour then you can take out and place them in a container or bag and store in the freezer.

Categories: Banana, Chicken, Eggs, Salad, Smoothie, Uncategorized, Veggies | Tags: , , , , , , , , , , | 2 Comments

Mission Impossible: Eating Healthy on a Budget

Upon returning to California, it was clear Bobby and I had both consumed a dozen or so too many Christmas cookies and we needed to get serious about our diet. Not “diet” as in that month or two long starvation period in which you want to kill or eat everyone and everything in sight, but “diet” as in what we eat on a regular basis. After a year of turmoil and unsettling changes, I was tired of not feeling like myself and now, not even looking like myself. My mission?  To eat healthy on a TIGHT budget. Impossible, right?  Seems like the chemical rich, full fat junk food is cheaper than real healthy food… but I accepted the challenge knowing that it take time, work, planning and commitment.

PLANNING the MISSION
Thanks to countless hours on Pinterest, I got a great start with some ideas for bulk meal planning, collected some recipes and made up a massive grocery list that centered on vegetables, fruit, and lean protein.  The biggest “idea” I decided to try was bagging my own meals, freezing the bag and it would then be ready to cook in a Crock Pot at some date in the future (more on this below). I had 20 dinners planned, with six for the crock, as well as breakfast and lunch ideas for my grocery list. I figured 20 dinners, with leftovers, would feed us about a month.

With my list in hand, Bobby and I had fun exploring grocery stores in Chico for the best deals and spent $252 on food that we hoped would last us a month (except basics we’d have to replenish – milk, etc.). We focused on the lowest $/lb for meats and found chicken parts (yes, bone in, don’t be scared) for 88 cents/lb, boneless skinless chicken breasts for under $3/lb, tilapia and ham for under $2/lb, and chuck roast for $1.48/lb. In Winco, they have a large bulk foods section where you can bag your own nuts, flours, agave nectar, corn flakes, and more! About 4 aisles of bulk goodness and was shocked to find nuts at $2 less/lb than the regular packaged options. I was also able to bag small amounts of spices (I needed cumin but didn’t want to spend $5 on a little bottle) for a fraction of the cost. I knew fresh veggies would only last so long, that my freezer is only so big, and picked up some canned veggies for later in the month. What can I say, I LIKE canned wax beans!

PREPARATION
The day after grocery shopping I spent about 4 hours prepping meals, snacks, etc. My theory was that spending one day a month to prep meals, etc. would save time after work on busy days to cook dinner, and on my days off so I wouldn’t have to spend 3-4 hours on the road driving from East Bum F*** to the nearest town to get supplies.  I now accept that I live in a location where planning and stocking up is a necessity, not a choice. At $4.19 a gallon for gas, just getting groceries costs us $40-50/trip!

I started by making some staples:

Dr. Oz’s Metabolism Boosting Tangerine Green Tea (make 8 cups green tea, add a sliced tangerine
and a small handful of mint leaves then place in the fridge overnight)

Chicken Stock (I had roasted a chicken a couple days prior and used this to make the stock)

Roasted asparagus (for a snack and for use in a dinner later in the week; toss w/ olive oil, s&p, garlic
powder & roast in a 425 oven for 20 min or so)

Balsamic Vinaigrette: (1/4 c. evoo, 1/2 c. bal vin, garlic, s&p)

Light Ranch Salad Dressing:

1/2 cup light mayonnaise
1/2 cup sour cream
2 t olive oil
2 t lemon juice
1/4 cup buttermilk (I already had powder to mix w/ water, otherwise I’d use milk w/ vinegar)
1 Tbsp chopped green onion (I grow my own…more on that in a future post!)
1 t parsley
1 clove garlic
1/2 tsp sea salt
1/4 tsp freshly ground black pepper

Mix all and store in an air-tight jar in the fridge.  Leftovers will keep 2-3 weeks.

Then, I put together some food for work:

I bagged everything I would need for work lunches and snacks  for the next several days (salad, cooked
chicken, homemade balsamic vin, sliced cucs & asparagus) so I could grab the whole bag and take it with
me to cut down on the morning FRENZY in getting out the door.

And last, the Bagged Crock Pot Freezer Meals:

The idea is to take any Crock Pot recipe you have, put all the ingredients (except any dairy or last minute additions), put everything into a freezer bag, shake to mix, then freeze.  On the day you want to cook it, take it out, thaw for 30 minutes if you have time, if not, dont. Then put it in the crock pot for 4 hours on High or 8 hours on Low.

I put together these meals and on the day I cook them, I’ll share the recipe and review it!

Chicken & Cherries

Chicken Curry

BBQ Chicken

A1 Pot Roast

Pineapple Chicken

Beef Goulash

When I was done my bags looked like this:

In the meantime, until we try one of those bag meals I’ll be sharing some other great healthy meals and snacks with you, like:

Egg Beater & Ham Frittata

Strawberry Spinach Salad w/ Walnuts & Chicken

Banana Bites

Parmesan Chicken & Roasted Broccoli

Asparagus Stuffed Chicken & Roasted Veggies

PB & Banana Smoothies

And more!

It’s all about making food that’s good for you taste really really good!  Please comment with any questions or things you like!

Categories: Uncategorized | 5 Comments

Blog at WordPress.com.

Design a site like this with WordPress.com
Get started